Window Cling is either light adhesive-backed or designed to cling by using static and prints in full color on one side. It is designed for display on window glass, though you can also use it on other smooth surfaces. Window Cling comes in a range of sizes from 1' x 1' to 75' by 52" (inches).
Because of the wide potential size range of our large format products, there are additional file setup considerations. Proofs are typically shown half size. For other details, please review the file setup section carefully.
Due to material, all substrates may expand or shrink from batch to batch, which makes exact cuts very difficult. We do not recommend borders. If you would like borders, please make sure they are at least 2" thick. We will not reprint if the borders are not exactly the same on all sides after cutting.
Recommendations
The most common order options are 3' x 5' on 8mil White Low Tac Wall decal. Window Cling is printed in full color on one side (4/0).
Note: Window Cling may not have desired results if printed with full coverage (ink filling the entire sheet). Leaving spaces in or around your design will increase the area that connects the cling to the window. If you choose to print full coverage, we recommend Low-Tac for best results.
Marketing Tips
Window Cling is a way to use your windows to tell a message, whether it's a clearance sale, new inventory arrival, or something less conventional. Window Cling material applications have expanded beyond the window to include painted walls and smooth surfaces of all kinds. Use Window Cling for promotional messaging. When you want to display your message on a window or a wall and be able to remove it without leaving residue or pulling paint (in good condition), try Window Cling.
Custom Sizes
Custom Sizes
Our standard sizes, listed below, are the most popular in the industry:
Available in custom sizes ranging from 1' x 1' up to 75' wide x 52" high.
8mil White Low Tac Wall decal
7mil White Static Cling
Sample Books
8mil White Low Tac Wall decal
Designed for indoor use, this white, mild adhesive-backed substrate creates a white background for your design. The Low-Tac adhesive helps keep the Window Cling in place with very little to no residue left upon removal.
7mil White Static Cling
Designed for indoor use, this white, static cling substrate creates a white background for your design. Static cling uses static rather than adhesive to hold the window cling in place, so there is no residue left upon removal.
Note: Window Cling may not have desired results if printed with full coverage (ink filling the entire sheet). Leaving spaces in or around your design will increase the area that connects the cling to the window. If you choose to print full coverage, we recommend Low-Tac for best results.
Sample Books
Every Zoo customer may order one free 4-Color Offset sample book. Additional sample books and a complete kit can be ordered by clicking here.
4/0 (Full Color Front Side Only)
4/0
Full color (cyan, magenta, yellow, and black as above) on the front and no printing on the back. A typical example of this is a poster.
No Lamination
No Lamination
This product prints in a professional, finished quality.
Explanation of Turnaround Time
Next Day
1-2 Day
2-3 Days
Explanation of Turnaround Time
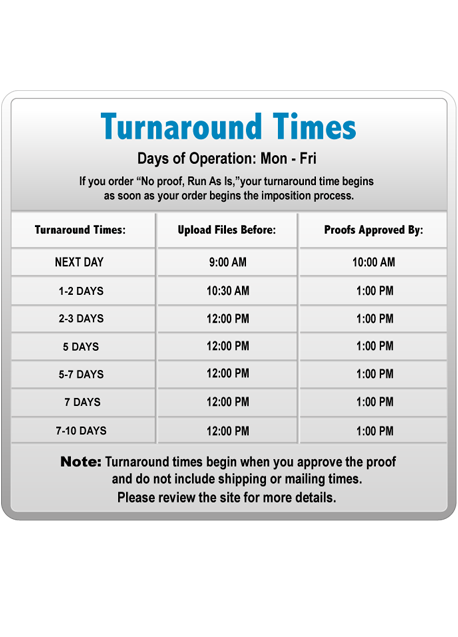
See a quick chart showing turnaround times
Production timeline beings upon approval of the proof. All times are based on standard business days Monday through Friday excluding federal holidays. For orders shipping to the West Coast, please use the Pacific time zone. For orders shipping to the Midwest and East Coast, please use the Eastern time zone. Please see the below map.
Please note the production timeline does not include shipping or mailing time. During the order process you will have the option to select from available production timelines and your preferred shipping method.
Our products are the same great quality for every turnaround time we offer.
Next Day Turnaround
If you order a proof (Online PDF or Hard Copy), turnaround begins once the proof is approved. If you select No Proof – Run As Is, turnaround follows the guidelines below
Once your order enters imposition, you’ll receive an email with your estimated completion date (shipping and mailing not included).
Guidelines
Files must be uploaded by 9 a.m. PT (West Coast production) or 9 a.m. ET (East Coast production).
Proofs must be approved by 10 a.m. in the production facility’s time zone to begin turnaround.
A. Next Day - Shipped Orders
Orders are ready to ship the next business day after 4 p.m. Example: A Next Day order placed Monday before the cutoff ships Tuesday after 4 p.m.
B. Next Day - Will Call Orders
Orders are ready for pick up the next business day after 10 a.m. Example: A Next Day Will Call order placed Monday before the cutoff is ready Tuesday after 10 a.m.
C. Next Day - Local Delivery Orders
Orders are delivered the next business day between 8 a.m. and 4 p.m. Example: A Next Day Local Delivery order placed Monday before the cutoff is delivered Wednesday.
Note: Local Delivery is currently available only near our California production facility. Check your ZIP code under Services > Local Delivery.
Files uploaded after the cutoff are processed the next business day.
1-2 Day Turnaround
If you order a proof (Online PDF or Hard Copy Proof), your turnaround time begins as soon as you approve your proof in our system. If you order "No Proof, Run As Is" (only recommended if you are certain you want us to print what you sent as is), your turnaround time will be based on the guidelines listed below. Once your order is in imposition, you should receive an email with your estimated order completion date (does not include shipping or mailing).
Guidelines
Files must be uploaded before the cut off time, which is 10:30 a.m. Pacific for orders produced in our West facility and 10:30 a.m. Eastern for orders produced in our East facility. If you request a proof, you must approve your proof by 12:45 p.m. in the time zone your order is produced for turnaround time to begin.
A. 1-2 Day Shipped Orders
These orders will be ready to ship in 1-2 business days after 4:00 PM. Example: A Next Day order placed Monday before cutoff would be ready to ship Tuesday after 4:00 PM. A 1-2 Day order placed Monday before cutoff would be ready to ship on Tuesday or Wednesday after 4:00 PM.
B. 1-2 Day Will Call Orders
These orders will be ready to pick up in 1-2 business days after 4:00 PM. Example: A Next Day order placed Monday before cutoff would be ready for pick up Tuesday after 10:00 AM. A 1-2 Day order placed Monday before cutoff would be ready for pick up on Tuesday or Wednesday after 4:00 PM.
C. 1-2 Day Local Delivery Orders
These orders will be ready for delivery in 1-2 business days. Example: A Next Day order placed Monday before cutoff would be ready to deliver on Wednesday between the hours of 8:00 AM and 4:00 PM. A 1-2 Day order placed Monday before cutoff would be ready to deliver on Wednesday or Thursday between the hours of 8:00 AM and 4:00 PM *Local Delivery adds one day to your print cycle.
Note: Local delivery is currently only offered to customers near our California production facility. To see if your zip code qualifies, visit "Local Delivery" under the "Services" section.
Files uploaded after the cut off time will be processed the following business day.
2-3 Day Turnaround
If you order a proof (Online PDF or Hard Copy Proof), your turnaround time begins as soon as you approve your proof in our system. If you order "No Proof, Run As Is" (only recommended if you are certain you want us to print what you sent as is), your turnaround time will be based on the guidelines listed below. Once your order is in imposition, you should receive an email with your estimated order completion date (does not include shipping or mailing).
Guidelines
Files must be uploaded before the cut off time, which is 10:30 a.m. Pacific for orders produced in our West facility and 10:30 a.m. Eastern for orders produced in our East facility. If you request a proof, you must approve your proof by 4:00 p.m. in the time zone your order is produced for turnaround time to begin.
A. 2-3 Day Shipped Orders
These orders will be ready to ship in 2-3 business days after 4:00 PM. Example: A Next Day order placed on Monday before cutoff would be ready to ship Tuesday after 4:00 PM. A 2-3 Day order placed Monday before cuttoff would be ready to ship on Wednesday or Thursday after 4:00 PM.
B. 2-3 Day Will Call Orders
These orders will be ready for pick up in 2-3 business days after 4:00 PM. Example: A Next Day order placed Monday before cuttoff would be ready to pick up Tuesday after 10:00AM. A 2-3 Day order placed Monday before cutoff would be ready pick up on Wednesday or Thursday after 4:00 PM.
C. 2-3 Day Local Delivery Orders
These orders will be ready to deliver in 2-3 business days. Example: A Next Day order placed Monday before cutoff would be ready to deliver Wednesday between the hours of 8:00 AM and 4:00 PM. A 2-3 Day order placed Monday before cutoff would be ready to deliver on Thursday or Friday between the hours of 8:00 AM and 4:00 PM. * Local delivery adds one day to your order due date.
Note: Local delivery is currently only offered to customers near our California production facility. To see if your zip code qualifies, visit "Local Delivery" under the "Services" section.
Files uploaded after the cut off time will be processed the following business day.
Fully Finished
Fully Finished
This product comes fully finished.
Large Format Quantity
Large Format Quantity
To see available quantities, click on the "Quantity" dropdown menu in the pricing calculator.
To request a custom estimate, click "Estimates" at the top of the page.
Get Templates
Create Your Own Templates
File Preparation
File Orientation
Bleed and Safe Area
Proofs and File Check
Please Select Template Below:
PDF stands for Portable Document Format. This template can be imported into: InDesign, Quark Express, Illustrator, Corel Draw, and many other content creation programs.
JPEG stands for Joint Photographic Experts Group and is a basic raster file format. This template is recommended for Photoshop.
EPS stands for Encapsulated PostScript. This template is recommended for advanced Illustrator users only.
Create Your Own Templates
Video tutorials coming soon!
File Preparation
In order to ensure your files are print-ready, we recommend that you upload them in PDF format. When you generate a print-ready PDF, your computer will use the settings in Adobe Acrobat Distiller or any other PDF generating programs you may use. Please make sure that these are set properly before generating your PDF file.
If you are uploading PDF files created in Photoshop, please be sure all layers are flattened.
We also accept .JPG (JPEG), .EPS and .TIF (TIFF) file types, however PDF is the preferred format.
Check your file to make sure it meets our file creation guidelines. This will help speed up the production of your project and give your printed piece the best results.
Use the CMYK colorspace (Cyan, Magenta, Yellow, blacK). These are industry standard printing colors. CMYK colors are different than RGB (Red, Green, Blue), which are used to display colors on your screen.
Use a minimum resolution of 150 dpi at 100% size for image files.
Specify trim area with crop marks. (Don't place crop marks inside the work area.)
Artwork should have 1/8" (0.125") bleed extending past the trim line. This is to prevent minor cutting variations from leaving unintended results at the trim edge.
Safe Area is the 1/4" (0.25") area inside the trim line. Do not put critical information or images within the Safe Area. This is to prevent minor cutting variations from leaving unintended results at the trim edge.
If you want printed borders, they must be placed a minimum of 1/8" (0.125") inside the trim line and include bleed. This is to prevent minor cutting variations from leaving unintended results at the trim edge.
File Orientation
Please click the link below for an explanation of file orientation.
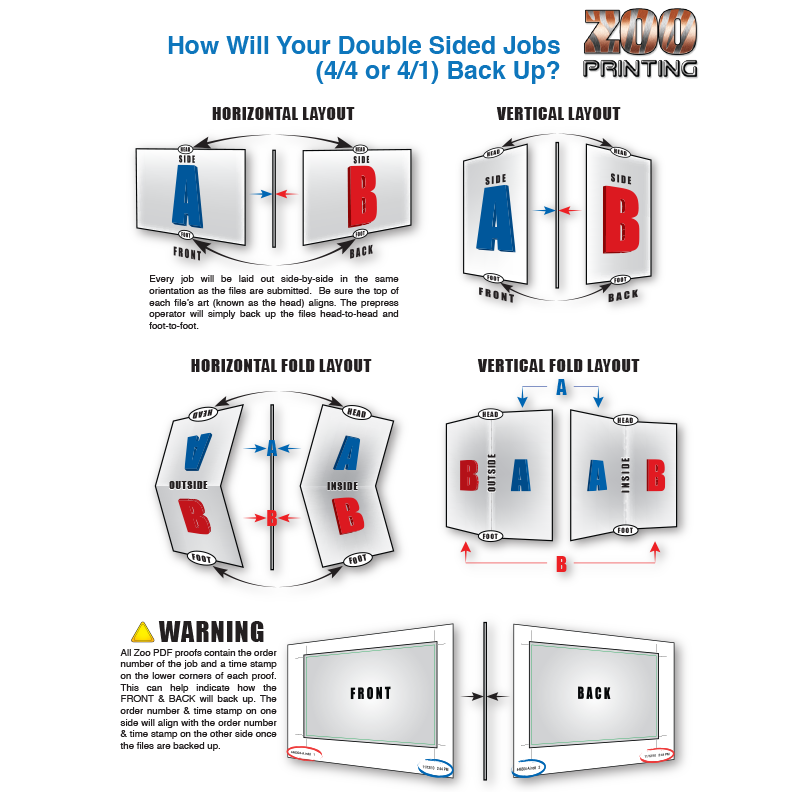
Note:If a job is placed as 4/4 and only one file is uploaded, prepress will automatically use the file for both sides of Large Format rigid products unless the artwork depicts an arrow. If only one file is uploaded for a 4/4 order and the artwork depicts an arrow, prepress will reject the job and request new files. This is to ensure your print does not have arrows facing opposite directions on either side of the final printed piece.
We require that you extend any images that run up to the trim line a minimum of 1/8" (0.125") past the trim line to create "bleed". Depending on what program you use to create your file, this may or may not change the total image area of your file. Programs like Photoshop that do not allow the creation of "bleed" or the addition of crop marks will require an image area that is 1/4" (0.25") larger than your desired final overall image area in both dimensions.
Safe Area is the 1/8" (0.125") area inside the trim line. Do not put critical information or images within the Safe Area. This is to prevent minor cutting variations from leaving unintended results at the trim edge. If you choose to make less than this minimum clearance, we will NOT be responsible for items that are cut off in this area.
Proofs and File Check
Window Cling offers two proof options:
Online PDF Proof: You will be sent a link to view your proof via email. Please keep in mind that this is only a proof for content and positioning; the color on your screen may vary from the color of your final product, depending on your monitor and viewing conditions.
No Proof, Run As-Is: This option is for the industry professional who is certain their project is ready to hit the press and does not require the additional security of a proof.
File Check:
If our prepress department sees anything questionable with your file, we will contact you via email with our concerns. Should prepress email you, please note that your job is not considered fully submitted until you respond to this email. This should be factored into your turnaround time.File check does not apply to No Proof, Run As-Is. No Proof, Run As-Is jobs print from the exact file(s) you upload unless it is not possible to print because your supplied file does not match the specifications ordered.
How to check your Online PDF:
The black crop marks indicate the final trim size. The Red line ( Dashed ) indicates the (Score) The Green line ( Dashed ) indicates the (Perf). The Red Line (Solid) indicates the ( Cut or Trim ) line.
The verbiage on the file, this will indicate the page position after folding.
Please Note: The charge for our technical team to review your file when first submitted is included in the price of your order. If they note technical concerns with your file, they may email you with their concerns so you can upload a corrected file. If subsequent uploads still contain errors, you may be charged an additional prepress fee to review your file again.